Did you know you have a business card you hand out every day on Google+?
Hover your mouse over any Google+ user’s name. You’ll see a popover box with their cover photo, profile image, their name, a link to add them to circles (or showing what circles you have them in already), and in most cases, their tag line and employment or location.
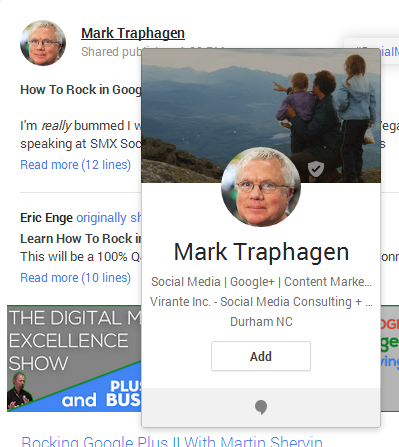
This is known as a hovercard.
Think of your hovercard as your business card on Google+. Most of the time, it is the only chance you’ll get to introduce and “sell” yourself as someone worth following.
You’ll want to make sure that your Google+ hovercard displays exactly what you want on your social business card
How to Customize Your Hovercard Subtitle
Under your name, the hovercard can display up to four items, depending on your profile. They are displayed in this order:
- Your profile tag line
- Your current employer
- Your current school
- Your current location (where you live)
Important! 2-4 in the list above will only display if you have the “current” box checked in the respective sections on your profile.
Here’s how to edit and include each customizable part of your hovercard text. All edits are done by logging in to your personal profile on the desktop version of Google+, choosing “Profile” from the left-hand menu, and then selecting the “About” tab at the top of your profile.
Tagline
- Find the “Story” card on your profile About tab.
- Click the Edit link at the bottom of the card.
- Click in the text box below “Tagline.”
- Enter or edit your Tagline text. Tip: The hovercard will only display the first part of your tagline. What is displayed is not a set number of characters; it’s dependent on the proportional spacing of the letters in the text. Experiment with your first words until you get something that fits in the hovercard.
- Click the Save button at the bottom of the edit screen
Current Employer
- Find the “Work” card on your profile About tab.
- Click the Edit link at the bottom of the card.
- Fill in the Employment information as completely as you want. Only what is in the first box for each place of employment (“Employer name”) is eligible to show on your hovercard.
- Check the “Current” box after the employer you want to show on your hovercard
- Click the Save button at the bottom of the edit screen
Current School
- Find the “Education” card on your profile About tab.
- Click the Edit link at the bottom of the card.
- Fill in the Education information as completely as you want. Only what is in the first box for each school (“School name”) is eligible to show on your hovercard.
- Check the “Current” box after the school you want to show on your hovercard
- Click the Save button at the bottom of the edit screen
Current Location
- Find the “Places” card on your profile About tab.
- Click the Edit link at the bottom of the card.
- Fill in Places Lived as completely as you want.
- Check the “Current” box after the location you want to show on your hovercard
- Click the Save button at the bottom of the edit screen
So where does your Google Plus Hovercard show up? <– click that link to find out! (Hint: there are over 20 places!)

This is really useful about the hovercard. Thanks!
Very useful – thanks!
I did notice that I could not see the changes on my own hovercard until after I signed out of and back in to Google+
Any tips on troubleshooting this? My tag line isn’t showing up on my hover card. I’ve tried varying length, no punctuation even though I see pipes etc on others’ hover cards… not sure how to get this to show up…
James, could you provide a link to the profile or page that you’re having trouble with?
I cannot see my tagline, either, just like James. My profile link is https://plus.google.com/+BillDavis007
Hi Mark is this still applicable, has google changed the settings? I can’t get my tag line to appear. My profile can be seen at https://plus.google.com/u/0/+PaulKoester/about. Thanks
Never mind I figured it out. I was expecting the changes to occur likewise on my profile. I see now that the hovercard shows up with its own cool uniqueness!
I got the part where you said “All edits are done by logging in to your personal profile on the desktop version of Google+, choosing “Profile” from the left-hand menu,” But I have no idea where the ABOUT is when you say ” and then selecting the “About” tab at the top of your profile.” I don’t see any ABOUT on my page. I guess I need pictures with arrows. Anything created by Google has a tendency to frustrate me immensely. So where is that ABOUT you are talking about????